Thursday, December 15, 2011

The Elf on the Shelf


Christmas is just 10 days away (yikes!) which means if you're like me you're running out of time to finish up shopping and running out of ideas for your Elf on the Shelf!

Friday, December 9, 2011

Clothespin reindeer


Like everyone else in MA, we got our tree this past weekend, so making Christmas ornaments seemed like the perfect activity for H and I to do last night. H has a serious reindeer thing this year, which I totally get. I loved reindeer as a kid too. They're kind of like horses (which H also loves), but they can fly. Magical. So making clothespin reindeer just seemed like a given.

Thursday, December 1, 2011

The Advent Calendar


A couple of weeks ago I was cruising through the craft store when I saw an unfinished wood advent calendar in the shape of a Christmas tree. I breezed by it at first but then found myself heading back to get another look. It had 24 little drawers with pull knobs. "How fun would it be to paint that...?" I thought to myself. At $25 it was more than I would probably spend on a finished advent calendar, so I decided to head home and wait for my weekly "50% off one item" coupon* to appear in my email box and then went back to buy it.

Tuesday, November 22, 2011

The Playroom


We moved into a new house a couple of months ago and one of the big selling points for me when we looked at it was the extra room off the kitchen – or, THE PLAY ROOM. We’ve never had one previously but it was something I had often daydreamed about. I had always planned to make it gender neutral, but when it came time to decorate it I decided to let H do it. It is her playroom after all and I want her to enjoy being in there. 

Monday, November 7, 2011

Remainders: Other Random Halloween Crafts

This post is pretty much just a place for me to store the other crafts I did around Halloween this year so I remember them next year!

Friday, October 28, 2011

Cinderella's Pumpkin Coach


Last year, knowing how much I love crafts, my mother-in-law bought me a copy of the Penny Whistle Halloween book. It's filled with all sorts of cute and quaint kid-friendly ideas for costumes, recipes, crafts, and pumpkin carving. When I saw the "carve Cinderella's coach", I knew I had to do it.

Thursday, October 6, 2011

Rice Pum'kin Treats


So we just moved into a new house and all of my time the past week has been spent trying to get our new home together, so I didn’t have much time for crafting. BUT, I had an idea that I could not get out of my head so I decided I had to execute – and I have to say, the results were adorable and delicious!

Monday, October 3, 2011

The Fairy House


So the fairies that I made last week are pretty much an adult only project, at least as far as a 3 year old is concerned – although once the first one was made H began dictating when a new fairy should be made and gave specific instructions on dress and hair color. So I thought another way to keep H involved and take this project to the next level would be to make a house for the fairies.
*This project will not have the standard step by step instructions. At its most basic level, you just get a bunch of sticks and glue them together into a shelter like structure! But I will give a detailed account of how we made ours.
The first step was a huge hit with H – gathering supplies. We grabbed H’s Cape Cod tote bag, tucked a fairy into the front pocket, and headed over to the park. I showed her the type of sticks we needed and she was off. I think because of the hurricane-like weather at the end of the summer there was actually an ample supply of small sticks. She also grabbed a bunch of small flat stones and a few acorns – which she insisted on calling “pineapples”!
Once we got back home I did a quick search for a foundation for our house. I have a bag of randomness for the recycle center at the Children’s Museum and in it I found the perfect thing – the cover from a book binding. I set H up at the table with a bunch of green and brown paints and she got to work painting the lawn of our house foundation. While she worked on that, I started snapping sticks in half to make them all roughly the same size.

Once the foundation was painted a dried, I got to work on the house. This involved the hot glue gun and basically just stacking up sticks and gluing them together to make 3 walls. Having recently burned her finger on a popcorn popper, she was more than happy to stay away from the hot glue gun and focus on watching, giving the occasional direction and sorting through the silk flowers and leaves for the roof… ok she may have wandered off and watched Backyardigans for a bit too!
For the roof I did a few sticks that joined at the top tee-pee style and then glued flowers and leaves to the roof and stuffed some moss between the cracks between sticks. H picked out 3 flat stones and we glued them to the base to make a walkway up to the house. Then we took it outside and introduced the fairies to their new home!


NOTE:
If you have a dog, you may want to leave the fairy house some place high when you’re out. We learned this the hard way. We’re not sure if our dog Ella loves sticks or hates magic, but either way she tore into that house and completely destroyed it! Fortunately, no fairy was hurt in the demolition and we were able to rebuild!


Monday, September 26, 2011

Pipe Cleaner Fairies


There are 2 things that I always have on hand – one is pretty scrapbook paper and the other is silk flowers. Silk flowers are great for craft projects (in fact, I think all of my upcoming projects will use them!) and they tend to go on sale fairly regularly at craft stores. Another great source for cheap silk flowers is the dollar store.
So I’ve had this thought for a while that silk flower petals would make great fairy skirts, and I had a vague memory of seeing small fairies made with pipe cleaners and large wooden beads. So after a quick search of the internet I found this great tutorial on Treasures for Tots for making quick and adorable fairies: http://treasuresfortots.blogspot.com/2009/10/how-to-make-tiny-fairy-doll.html
I was thrilled to discover that I had all the supplies needed on hand and was even more excited by how easy they were to make – one fairy took less than 30 minutes!
Supplies:
  • Pipe cleaners (light colors are best but anything will work
  • Wooden beads
  • Embroidery floss (I have a large multicolor pack that I bought on sale – I used off white for the “skin” and yellow for the hair)
  • Felt for dress and wings – I used regular soft felt for the dress and stiff glitter felt for the wings. Treasures for Tots has a template but, as per usual, I eyeballed it!
  • Ribbon
  • Hot glue gun
  • Silk flowers with medium to large petals (optional: small silk flowers for flower hats)
  • Scissors


Step 1: Fold the pipe cleaner in half and thread through the bead


Step 2: Thread “hair” through the loop above the bead and then pull loop down halfway through the bead. Twist to secure

Step 3: Shape pipe cleaner into body

Step 4: Tie embroidery floss under the bead (around the neck) and begin wrapping the top part of the pipe cleaner arm –don’t worry if the pipe cleaner “fuzz” sticks out a bit!

Step 5: Once you get to the end of the arm, fold the wrapped and unwrapped parts of the arms together and begin wrapping them together, heading back towards the body

Step 6: Repeat process with the other arm and then make your way down the body, using the same technique to wrap the legs


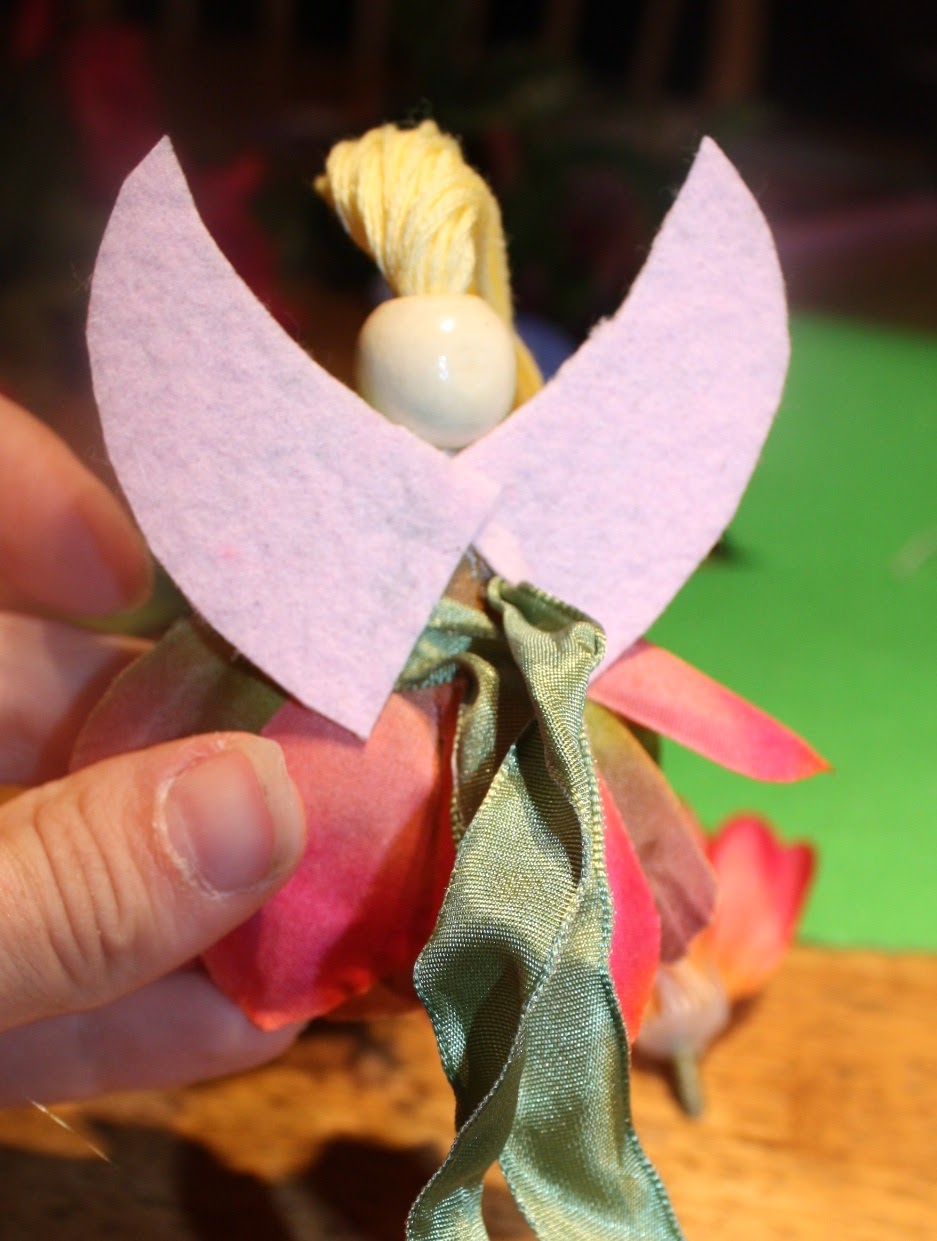
Step 7: Cut out dress and wings – like I said, I eyeballed this because I knew the majority of my dress was going to be covered by flowers


Step 8: Silk flower skirt – be as creative as you want to be with this part! I pulled apart 2 silk flowers and cut out the petals and hot glued them onto the felt dress. I then tied a ribbon around her waist to cover the tops of the petals.


Step 9: Glue on the wings


Step 10: Finishing touches – I used a black permanent marker to draw a basic “two eyes and a smile” face and used the hot glue gun to glue the top of her hair to the bead and then braided it. Then I stuck a small flower into the top of the bead as a flower hat.


They have been a huge hit with H and she’s asked me to make more. She even took one in to school for show and tell.
When H asked me why they have flower hats, I explained that it’s so they can hide in the flowers:


Next week’s project: the fairy house….

Thursday, September 22, 2011

Paper Beads


One of the many great things about having a 3 year old is her growing ability to sit and focus on a task, to ask questions about it, and her sense of pride when it’s finished. Along with doing crafts with her (or “craps” as she calls them) it’s also fun to do crafts FOR her. Unlike the first two years of her life, she now enjoys playing by herself for fairly long periods of time while I sit at the table making her a flower headband or a felt animal.

So I thought I’d start recording the crafts we do (or that I do) and provide instructions here. I tend to do easy crafts with big rewards. I only drag out the sewing machine when absolutely necessary – I’m a huge fan of hemming tape, my hot glue gun, and hand sewing. I also tend to improvise with things around the house. So I promise these are easy and fun and can involve your little one – or not. Personally I find them to be very relaxing!

So I thought I’d start with one we did last week: paper beads. Remember paper beads? So fun, so easy and so pretty.

You'll need:

  • Scrapbook paper – I buy scrapbook paper whenever I see it on sale. It’s pretty and works for lots of projects (like birthday cards) and it’s a thicker stock, which is good for toddler projects
  • Glue stick and clear Elmer’s glue
  • Scissors
  • Small paintbrush
  • A stick - for rolling the beads. I used a grill skewer with the end popped off
  • String or ribbon for making your necklace
  • Optional: I put my beads on pipe cleaners to dry because the bead is less likely to dry to the pipe cleaner and they are easy to remove once dry. I also sealed them with clear nail polish

Step 1: Cut the paper into long triangles
Somewhere on the Internet there is a tutorial with exact measurements for how to space these triangles. I just eyeball it.


Step 2: Glue
Place the paper color side down on a scrap piece of paper and use the glue stick to spread glue down the whole length of the triangle This is a great part for toddler involvement. They love glue sticks.


Step 3: Rolling the bead
Use the stick to roll the triangle onto itself. The roll should be tight – you are essentially gluing the paper to itself.


Step 4: Sealing
Use the paintbrush to paint the clear Elmer's glue onto the bead.


Step 5: Let the beads dry
This was my solution for how to let them dry without touching anything! An optional additional step is to paint clear nail polish onto them once the glue dries as an extra layer of protection.


Step 6: String the beads into a necklace
Optional Step 7: put necklace on toddler and take pictures of how adorable they look!